Bun-Appétit

Happy cooking, happy eating

Vanilla butter cookies

2013-09-10 22.02.31


It’s the Great British Bake-off season these days and I have been inkling to put my baking hat back on and give some well deserved love to my recently lonely oven. So, I sacrificed my 1 hour of TV time last night and managed to create my best cookies yet. All thanks to Martha Stewart!


Ingredients:

  • 3 cups all-purpose flour
  • 3/4 teaspoon baking powder
  • 1/2 teaspoon salt
  • 225g unsalted butter (softened) – omit salt if you’re using salted butter
  • 1 cup sugar (I used 2/3 cup and was just as good)
  • 1 large egg
  • 2 teaspoons pure vanilla extract (you can use vanilla beans or maple syrup, tastes just as good)

Method:

  1. Whisk together flour, baking powder, and salt in a large bowl. Beat butter and granulated sugar with a mixer on medium-high speed until pale and fluffy. Beat in egg and vanilla. Reduce speed to low. Add flour mixture, and beat until combined (or you can mix and knead the dough by hand, it just as good).
  2. Flour a clean worktop surface or a large chopping board and roll out the dough until it’s 0.5in thick and cut out your cookies in your favourite shape.
  3. Line a large baking tray with baking paper and place the cut out cookies on the baking tray approximately 1 inch apart.
  4. Pop your cookies in the refrigerator for about 15 minutes. In the meantime, pre-heat your oven to 160 degrees (fan assisted).
  5. Put the cookies in the oven and bake for 10 minutes.
  6. Once done, let the cookies cool on a wire-rack or just leave your baking tray out until the cookies are completely cooled.
  7. Sprinkle with icing sugar or decorate with royal icing and enjoy! 🙂

 

Leave a comment »

Bonjour à nouveau


Okay.. so it’s been a while since I’ve posted any of my kitchen adventures on this blog. Infact, on my hunt to set up a new baking blog I realised that I actually had 2000 or so visits on this one over the last couple of years. Which is quite decent for the couple of readers I have (love you mom and dis). What was even more pleasing that some visitors were total strangers (and hence were not bribed in anyway to visit my blog). 

So, long story short, that inspired me to start blogging about my culinary creations again. Hopefully, I’ll stay active longer this time. Meanwhile, enjoy! 🙂


Leave a comment »

Coconut burfi (yummylicious coconut treats)

Hello folks,

It’s been a while since I went experimenting in the kitchen. And apparently, my writing skills have also taken a backseat with so much going on these days. Please forgive me if it sounds dry and uncharacteristic today (and enjoy the treat!)

So, it was Eid day again. Though not my favourite time of the year when back home but it did help being in London (not with nightmares however!). Anyway, so I wanted to do something special and the idea just dawned to me and I decided to make coconut burfi for eid breakfast. And to tell you the truth, hubby is not a fan of sweets but he liked it somehow.. =D (two cheers!)

I’ve been such a klutz, that I am, this time and I thought I took a proper picture of it but just realised that I didn’t! (thanks to ********!!) Anyway, here goes;

Things you’ll need;

300-400 gm dried and chopped coconut (unsweetened)
250-300 gm Nido or any other powdered milk
250 gm Condensed milk
1/4 cup Oil/Ghee
1/2 cup skimmed milk
Food colour of your choice

What you need to do;

1. Roast coconut in a non-stick dry pan till you get the oily aroma but the coconut is not browned.
2. Add condensed milk in bits and keep stirring until it forms a sticky dough.
3. Add Nido and stir.
4. Add half of the oil to soften the dough.
5. Keep adding milk in bits and knead.
6. Mix the food colour in water/milk and add to the dough. Mix well to give it uniform colour through out.
7. Add left over oil to give final touches.
8. Pour out in a pan and leave to settle for a few hours.. then cut into pieces and sprinkle with almonds, pistachios, and what not! Enjoy!

Tip: You can use packaged shredded coconut. I went crazy and used fresh. The key to using fresh coconuts for this is to peel them and put them in the oven on 50 degrees for about 10-15 minutes or until they become dry and you can smell the coconut oil. Cut into small pieces and just throw into the chopper. And ladies and gentlemen, there you have it.. your home made coconut shreds.

Leave a comment »

Gulab Jamuns

Although it’s been ages since I wrote about one of my experiments, this one deserved a post of its own. And since it’s Eid-ul-fitr, I thought it would help at least one person out of my two readers (yeah, mum and disi =p) who can make this on eid day. The recipe is surprisingly simple and very easy to make. I was able to make the whole batch within an hour. Anyway, here goes;

Ingredients:

For Gulab Jamuns

1 1/2 cup Nido milk powder
1 1/2 tsp Baking Powder
1 tbsp plain flour (maida)
2 tsp semolina (suji)
2 medium eggs
1 tbsp unsalted butter
Vegetable oil for frying

For syrup (sheera)

1 glass water
200 gm sugar
1 pinch yellow food colour (zard rung)

Directions:

1. Mix all gulab jamun ingredients and knead well. The dough would be sticky at first but then would settle into a soft dough ball. If its too sticky, touch with Nido milk powder.
2. Fill the wok/frying pan with oil for deep frying the gulab jamuns and put on slow heat (2 on electric stove)
3. Make small balls and put in the pan. Make sure the balls are deep fried otherwise they wont have uniform brown colour on them.
4. Put the water and sugar on heat with food colour and bring it to boil. Pour in a deep pan to dip the gulab jamuns in.
5. Once the gulab jamuns are brownish, stir and make sure the colour is uniform. Do not touch with a spatula until a little golden brown otherwise they will break.
6. Pour them out in the syrup and keep for about an hour at least so that the balls can absorb the syrup.
7. Garnish with your choice of dry fruit.
8. Enjoy garma garam gulab jamuns with family and friends! =D

[edit]
Oh.. and Eid Mubarak to all! =)
[/edit]

This slideshow requires JavaScript.

Leave a comment »

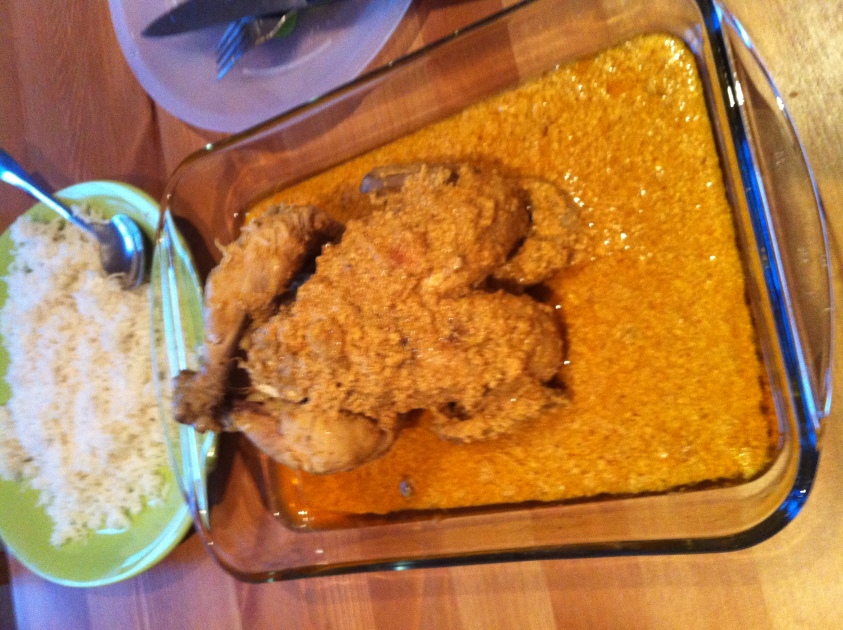
Baby Chicken

Baby Chicken or as we used to call it while growing up (and still) “Baby Murghi” has been an Eid Feast tradition at the Bandukdas for as long as I can remember. While I was never a fan and a tad bit too sensitive regarding Bakra Eid (Eid-ul-Azha) rituals and reserved my food intake to non-dairy and strictly vegan, Eid-ul-Fitr has always been a time of joy (read: Eidi =p) and a festive season. And the highlight was always “the” lunch, where mum would bring out the guest of honour to the dining table while we waited impatiently for the mere sight of the delicious miracle.

Well, all thanks to mum I took this task upon myself to cook the traditional baby chicken today, and it brought back memories of those unforgettable pre-marriage-move-to-london eid days. And since I’m going to be spending my first eid here (sadly) I thought why not carry forward this delicious tradition. So, here goes..

What you’ll need

1 baby chicken (without skin)
1-2 tsp ginger paste
1-2 tsp garlic paste
1 medium sized onion
3-4 tbsp lemon juice
5-6 green chillies
1 tsp red chilli powder
1/2 tsp turmeric powder
1-2 tsp salt
300 gm yoghurt
1/2 cup vegetable oil
3-5 cardamom pods

What you’ll do

1. Chop onion into paste along with green chillies. Add lemon juice, ginger and garlic. Mix well.
2. Wash and clean baby chicken inside out.
3. Make small incisions in the breast and legs and apply the marinade. Let the chicken rest overnight.
4. Mix red chilli powder, salt, and turmeric in the yoghurt.
5. Heat oil and fry cardamom pods until you can smell the cardamom.
6. Slow the heat and let the oil cool off a bit. Now, add the yoghurt paste and cook until its a bit thick and has lost most of the water so that the chicken doesn’t break when cooking.
7. Put the marinated chicken in the pan and cook on medium heat. Turn the chicken every few minutes for it to cook well on each side.
8. Enjoy with rice or fresh naan!

Tips:
1. Tie up the chicken legs and wings with a thread so that it doesn’t get twisted and doesn’t break while cooking.
2. Remove the chicken from the gravy when the chicken is cooked and the gravy is still watery. Cook the gravy until its thick and you can see the oil separating from the gravy. Add the chicken again and serve with rice or fresh naan.

Note: I’m dedicating this post to my family.

Mum, Dad, Aiy, Disi, Haru, Hammy, Umer, and Ayu… Love you all and miss you very very very much!

baby chicken

5 Comments »

Dahi Baray

Now dahi baray is one of those dishes that everybody likes personalised to their taste buds. Some like it sweet, some like it savoury. Some prefer baray/pakoray to be made from different kind of lentils, some like plain old chickpea flour (basin) pakoray. What I like in my dahi baray or dahi phulki is to be sweet and savoury at the same time. And I use chickpea flour for phulki(s). Oh, and loaaaads of chat masala.. (Dangit, just thinking about it made my mouth water!)

And the fun part is, its all just so easy!!

Here’s what you need;

Ingredients

500 gm Low fat yogurt (Always use low fat yogurt, takes the guilt away from your guilty pleasures =D)
3-4 tbsp Sugar
1 cup Chickpea flour
pinch of Baking soda
Salt to taste
Vegetable oil for frying
Water
Chat masala to taste

Method:

1. Mix yogurt and sugar and let it rest for about 30 minutes for the sugar to dissolve. Add some water to reduce thickness.
2. Add salt and baking soda in the chickpea flour and mix well before adding water.
3. Make a thick paste of chickpea flour.
4. Heat the oil in a wok and fry phulkis. I usually make them the size of a teaspoon.
5. Once the phulkis are fried, soak them in water for about 10-15 seconds and squeeze the water out lightly while taking out.
6. Add these phulkis in the yogurt atleast an hour before serving.
7. Sprinkle some chat masala and enjoy!

Tip:
You can also add boiled white chickpeas in yogurt and sprinkle with papri.

Leave a comment »

Veggie Pasty and Potato Cutlets

Yesterday was one of those days when you can’t set your mind on what to cook. I had half a bag of Sainsbury’s Instant Mashed Potatoes left and I had bought the Tesco Lighter Puff Pastry base to make veggie pasties one of these days.

To give a background to this story, me and hubby love Gregg’s veggie pasties. Can’t live without ’em. And the last few visits to the mall have had great impact on both my bank statements and my increasing waistline as Gregg’s veggies, delicious as they may be, come with a hefty 440 calories shock (half of them from fat), See for yourself. You can imagine my horror when one day while filling out my ‘myfitnesspal’ daily calorie intake I found out those yummylicious innocent looking ‘calorie bombs’ would probably be the cause of my untimely death due to heart failure. Okay, I guess I got carried away. =p LOL!

Anyway, so I thought why not try the puff pastry today.

Here’s what I did,

Ingredients:

1 pack Tesco Lighter Puff Pastry OR you can make one at home or buy at your nearest bakery/store
Mashed Potatoes
Chopped Veggies
Salt
Chaat Masala
Crushed Red Chilli

Method:

1. Let the puff pastry defrost (but keep it cool else the butter inside will start to melt)
2. Mix the mashed potatoes with veggies, salt, chat masala, and crushed red chilli. Add some Soya Sauce if you want.
3. Cut the puff pastry sheet in thick strips and dump a chunk of mashed potatoes on it. Wrap the sheet in squares around the potato and seal.
4. Bake in oven for 15-20 minutes on 200 degrees. Until golden brown.
5. Enjoy with your favourite sauce!

Tip: To give the pasty a shiny texture. Brush the top with egg. It looks absolutely gorgeous!

Oh, and we made potato cutlets of the remaining mashed potatoes =D

Leave a comment »

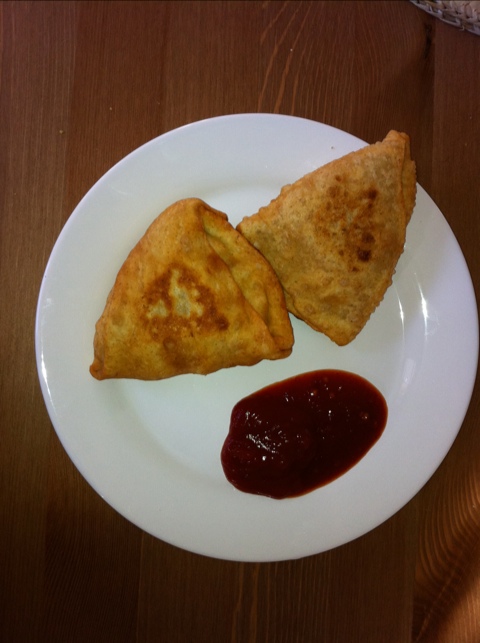
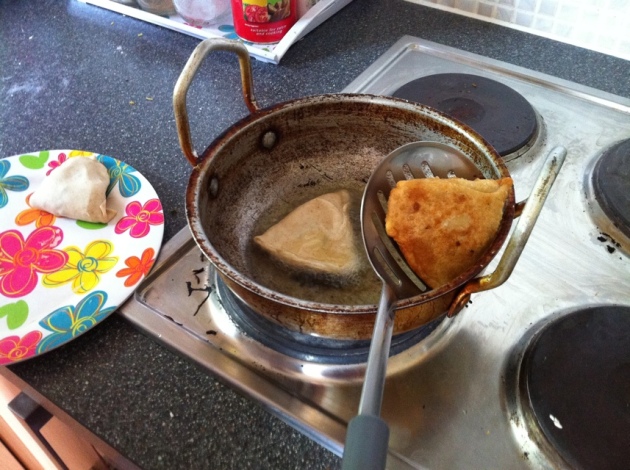
Aloo samosa

If I’ve learned anything from my mom about cooking, it is putting left overs to good use. It all started when I thought trying mashed potato mix from Sainsbury’s would be a good idea. Well it would be, if us desi’s were used to eating mashed potatoes, british style! Anyway, so I bought the mix and made some yesterday with my trial French Bread (and cheeeeeese!). It turned out quite nice actually, but there was tons left.. And yesterday’s left over mashed potatoes plus chopped veggies wrapped in plain flour wrap = Today’s Aloo Samosay

Here’s how I did it;

Ingredients:

Store bought mashed potato mix or boil 3 medium sized potatoes, boiled, and mashed.
Salt
Chopped or Dried Basil
Crushed Red Chilli
Lemon Juice
White Pepper
Coriander Powder
Chaat Masala
Mix chopped vegies + peas
Plain Flour

Directions:

1. Add the spices to mashed potatoes and mix.
2. Add chopped veggies and lemon juice and mix.
3. Add a pinch of salt to the flour and mix. Knead with oil until soft.
4. Separate the dough in small pieces and flatten them into round root like bases.
5. Cut each circle in half and put some potato mix on it.
6. Wrap the base around potato mix to form a triangle. Repeat for each samosa.
7. Fry (I fried shallow) the samosa until golden brown.
8. Enjoy with chilli garlic sauce/ketchup.

20110506-203139.jpg

20110506-203152.jpg

20110506-203410.jpg

2 Comments »

Shaped choco biscuits

20110416-192958.jpg

20110416-193008.jpg

20110416-193022.jpg

2 Comments »

Vanilla & Strawberry Custard

Here’s the latest creation from my kitchen. Although it got really hard to get the jelly stars out of the mold, with great determination and dedicated (wo)man power, we managed to land them in right places (almost)

This slideshow requires JavaScript.

2 Comments »